Destinations
Webhook
Webhooks are the most basic Destination to set up, and involve Terra making a POST request to a predefined callback URL you pass in when setting up the Webhook.
They are automated messages sent from apps when something happens.
Terra uses webhooks to notify you whenever new data is made available for any of your users. New data, such as activity, sleep, etc will be normalised and sent to your webhook endpoint URL where you can process it however you see fit.
After a user authenticates with your service through Terra, you will automatically begin receiving webhook messages containing data from their wearable..
Security
Exposing a URL on your server can pose a number of security risks, allowing a potential attacker to
Launch denial of service (DoS) attacks to overload your server.
Tamper with data by sending malicious payloads.
Replay legitimate requests to cause duplicated actions.
among other exploits.
In order to secure your URL, Terra offers two separate methods of securing your URL endpoint
Payload signing
Every webhook sent by Terra will include HMAC-based signature header terra-signature , which will take the form:
t=1723808700,v1=a5ee9dba96b4f65aeff6c841aa50121b1f73ec7990d28d53b201523776d4eb00In order to verify the payload, you may use one of Terra's SDKs as follows:
Terra requires the raw, unaltered body of the request to perform signature verification. If you’re using a framework, make sure it doesn’t manipulate the raw body (many frameworks do by default)
Any manipulation to the raw body of the request causes the verification to fail.
We recommend that you use our official libraries to verify webhook event signatures. You can however create a custom solution by following this section.
The terra-signature header included in each signed event contains a timestamp and one or more signatures that you must verify.
the timestamp is prefixed by
t=each signature is prefixed by a scheme. Schemes start with
v, followed by an integer. (e.g.v1)
Terra generates signatures using a hash-based message authentication code (HMAC) with SHA-256. To prevent downgrade attacks, ignore all schemes that aren’t v1
To create a manual solution for verifying signatures, you must complete the following steps:
Step 1: Extract the timestamp and signatures from the header
Split the header using the , character as the separator to get a list of elements. Then split each element using the = character as the separator to get a prefix and value pair.
The value for the prefix t corresponds to the timestamp, and v1 corresponds to the signature (or signatures). You can discard all other elements.
Step 2: Prepare the signed_payloadstring
The signed_payload string is created by concatenating:
The timestamp (as a string)
The character
.The actual JSON payload (that is, the request body)
Step 3: Determine the expected signature
Compute an HMAC with the SHA256 hash function. Use the endpoint’s signing secret as the key, and use the signed_payload string as the message.
Step 4: Compare the signatures
Compare the signature (or signatures) in the header to the expected signature. For an equality match, compute the difference between the current timestamp and the received timestamp, then decide if the difference is within your tolerance.
To protect against timing attacks, use a constant-time-string comparison to compare the expected signature to each of the received signatures.
IP Whitelisting
IP Whitelisting allows you to only allow requests from a preset list of allowed IPs. An attacker trying to reach your URL from an IP outside this list will have their request rejected.
The IPs from which Terra may send a Webhook are:
18.133.218.210
18.169.82.189
18.132.162.19
18.130.218.186
13.43.183.154
3.11.208.36
35.214.201.105
35.214.230.71
35.214.252.53
35.214.229.114
Retries
If your server fails to respond with a 2XX code (either due to timing out, or responding with a 3XX, 4XX or 5XX HTTP code), requests to it will be retried with exponential backoff around 8 times over the course of just over a day.
SQL Database
SQL databases are easy to set up and often the go-to choices for less abstracted storage solutions. Terra currently supports Postgres & MySQL.
Setup
You will need to ensure your SQL database is publicly accessible. As a security measure, you may implement IP whitelisting using the list of IPs above.
Next, create a user with enough permissions to create tables & have read & write access within those tables. You can execute the scripts below based on your database
Data Structure
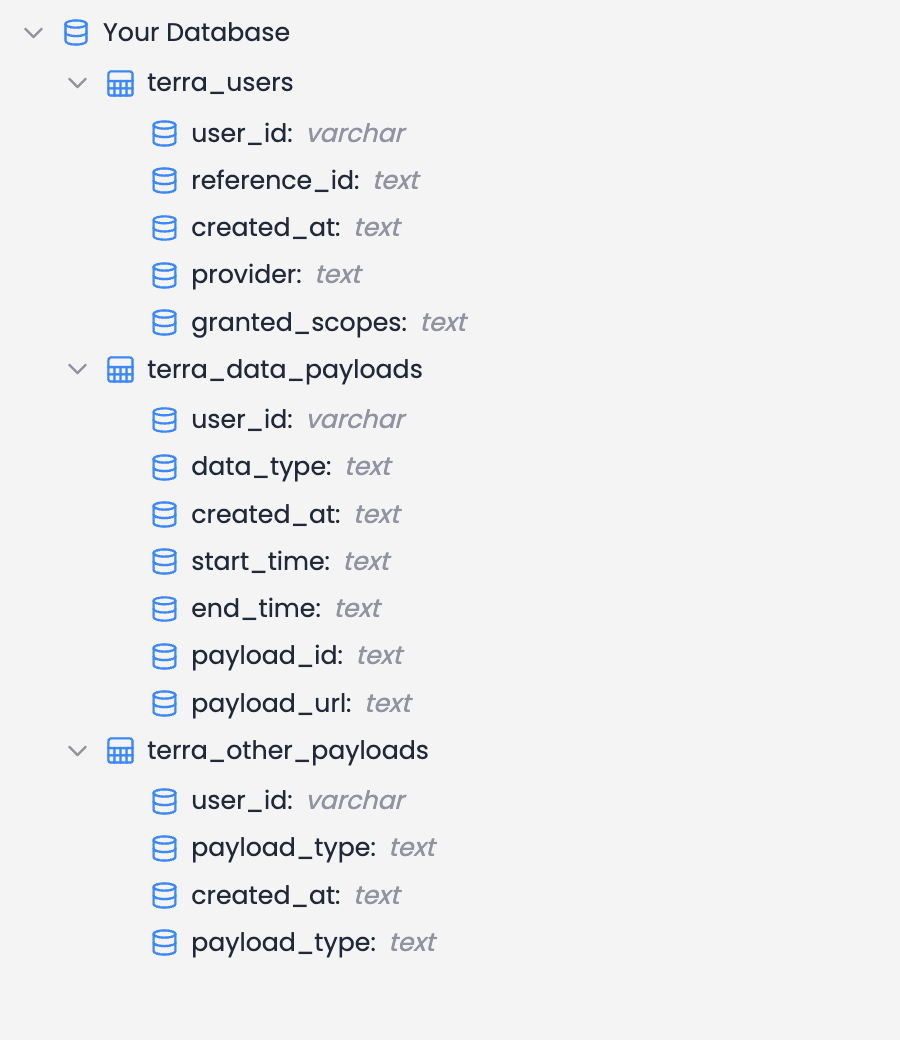
Data will be stored in tables within your SQL database following the structure below:

Users will be created in the terra_users table, data payloads will be placed in the terra_data_payloads, and all other payloads sent will be added to the terra_other_payloads.
When using SQL as a destination, Terra handles data storage for you. All data payloads will be stored in a Terra-owned S3 bucket, and the download link for each payload will be found under the payload_url column
Supabase
Supabase offers the best of both worlds in terms of allowing you to have both storage buckets and Postgres SQL tables. Both coexist within the same platform, making development a breeze.
Setup
Create a storage bucket with an appropriate name (e.g. terra-payloads) in your project
Create a table within your project. You do not need to add columns to it, Terra will handle that when connecting to it.
Create an API key for access to your supabase project. Terra will need read & write access to the previously created resources in steps 1 and 2.
You'll then need to enter the above details (host, bucket name, and API key) into your Terra Dashboard when adding the Supabase destination
Data Structure
When using Supabase (since you get the best of SQL and S3 buckets 🎉) Terra stores the data in the same structure as for SQL and for S3 Buckets. Follow those sections for more detailed information on how that is stored!
AWS Destinations
All AWS-based destinations follow the same authentication setup.
Setup
IAM User Access Key
The most basic way to allow Terra to write to your AWS resource is to create an IAM user with access limited to the resource you're trying to grant Terra access to. Attach relevant policies for access to the specific resource, (write access is generally the only one needed, unless specified otherwise)
Role-based access
In order to use role-based access, attach the following policy to your bucket:
GCP Destinations
You'll need to create a service account, and generate credentials for it. See the guide here for further details. once you have generated credentials, download the JSON file with the credentials you just created, and upload it in the corresponding section when setting up your GCP-based destination
Buckets: AWS S3/GCP GCS
Terra allows you to connect an S3 Bucket as a destination, to get all data dumped directly into a bucket of your choice. Follow the AWS Setup/GCP Setup section for setting up credentials for it
Data Structure
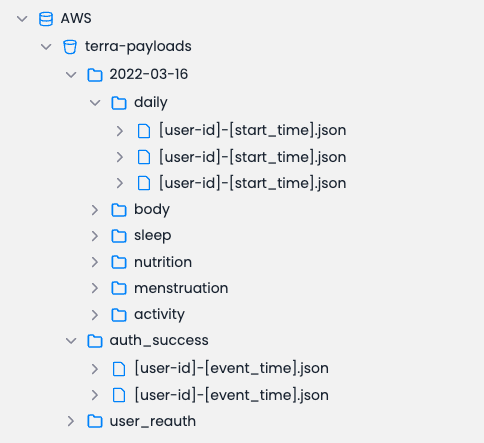
When data is sent to your S3 Bucket or GCS, it will be dumped using the following folder structure

Versioned objects will be placed under the appropriate API version (in the screenshot above, this corresponds to 2022-03-16)
In all, every event will have as a parent folder the Event Type which it corresponds to, and will be saved with a unique name identifying it.
As shown above, the name will either be a concatenation of one of the below:
For Data Events: the user ID & the start time of the period the event refers to
For all other Event Types: the user ID & timestamp the event was generated at
AWS SQS (Simple Queue Service)
AWS SQS is a managed queuing system allowing you to get messages delivered straight into your existing queue, minimizing the potential of disruptions and barriers that may occur when ingesting a request from Terra API to your server.
Data Structure
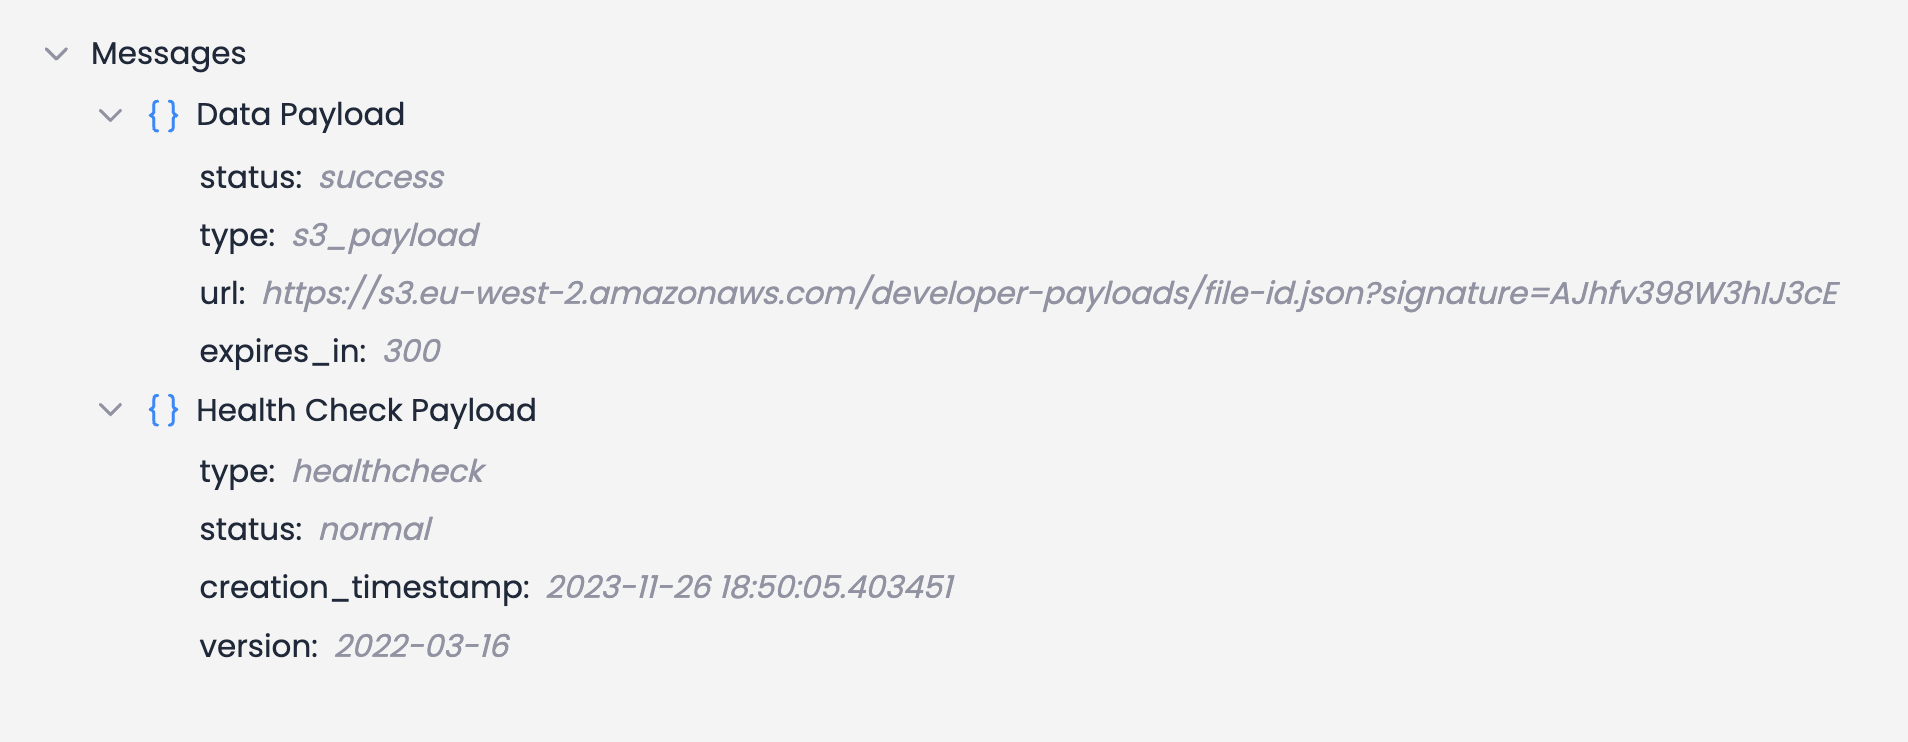
Data sent to SQS can either take the type of healthcheck or s3_payload. See Event Types for further details.

Each of these payloads will be a simple JSON payload formatted as in the diagram above. the url field in the data payload will be a download link from which you will need to download the data payload using a GET request. This is done to minimize the size of messages in your queue.
The URL will be a pre-signed link to an object stored in one of Terra's S3 buckets.
Note: Terra offers the possibility of using your own S3 bucket in combination with the SQS destination. For setting this up, kindly contact Terra support.
Last updated
Was this helpful?